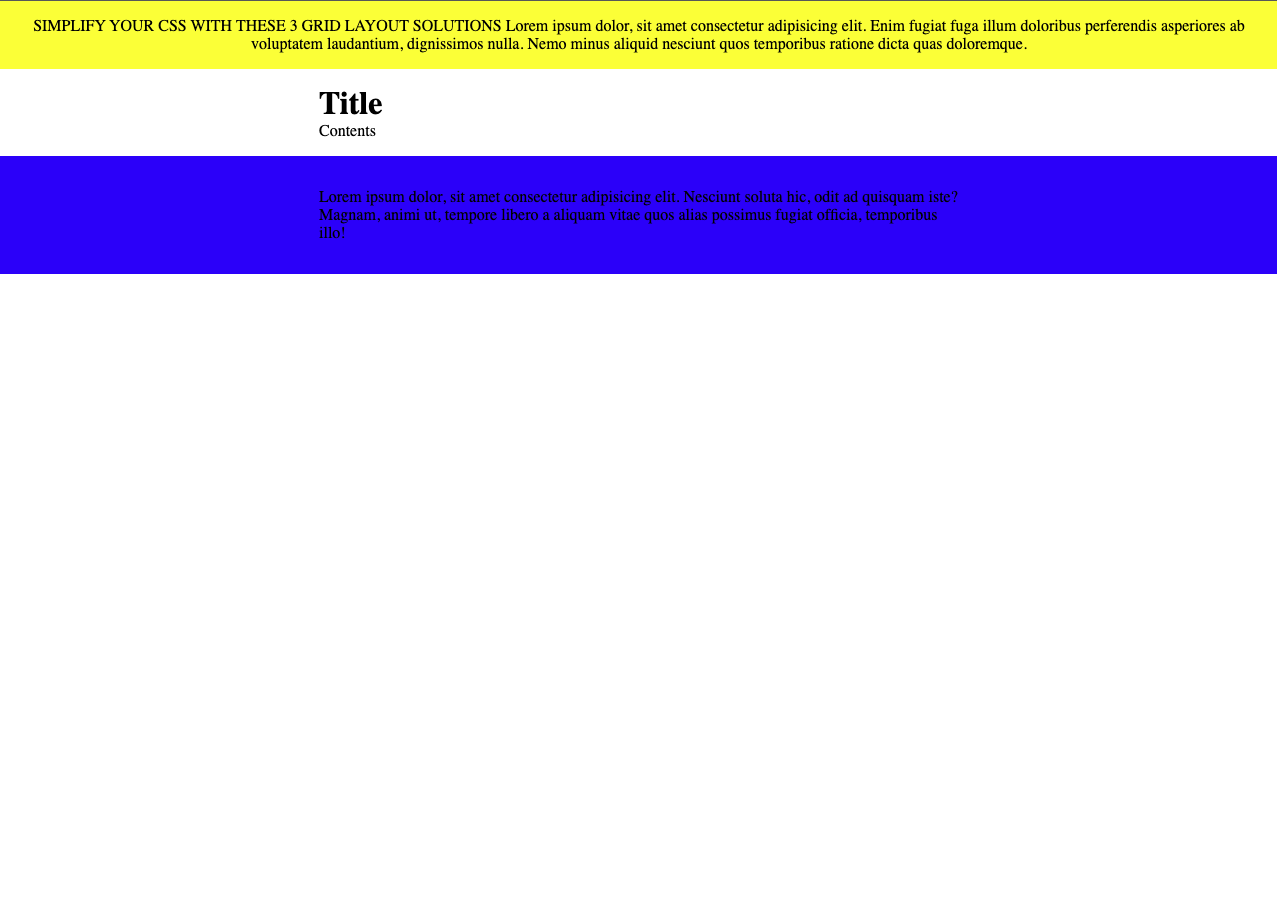
회문(Palindrome) 찾기

주어진 문자열이 회문이면 True, 아니면 False를 반환하라.

  • 입력: madam, 출력: True
  • 입력: tomato, 출력: False

방법

1. reversed(), join(), 리스트 컴프리헨션 사용

1
2
3
4
def isPelindrome(str):
reverse_str = "".join(list(reversed([x for x in str])))

return str == reverse_str

2. 슬라이싱 사용

1
2
3
4
5
6
word = 'racecar'

if word == word[::-1]:
print(True)
else:
print(False)
  • 슬라이싱은 [startIndex:endIndex:interval]로 사용하는데, startIndex, endIndex 없이 interval만 사용하여 역순을 표현했다.

3. 포인터 2개 사용

1
2
3
4
5
6
7
8
def is_palindrome(word):
left,right = 0, len(word) - 1

while left < right:
if (word[left] != word[right]):
return False
left, right = left + 1, right - 1
return True

댓글 공유

간단하게 Reset CSS 적용하기

1
2
3
4
5
6
7
8
9
10
11
12
13
14
15
16
17
18
19
20
21
22
23
24
25
26
27
*,
*::before,
*::after {
box-sizing: border-box;
}

* {
margin: 0;
padding: 0;
font: inherit;
}

html {
color-scheme: dark light;
}

body {
min-height: 100vh;
}

img,
picture,
svg,
video {
display: block;
max-width: 100%;
}

댓글 공유

그리드로 footer 만들기

grid 푸터 예시

우리는 푸터를 만들 때, 위와 같이 푸터를 하단에 고정하기 위해 고민한다.

나도 에이블 프로젝트를 할 때, 고민을 많이 했었고, position을 썼었던 걸로 기억하는데 깔끔하게 처리하지 못했었다.

1
2
3
4
5
6
7
8
9
10
11
12
13
14
15
16
17
18
19
20
21
<div class="main-layout">
<header>
SIMPLIFY YOUR CSS WITH THESE 3 GRID LAYOUT SOLUTIONS Lorem ipsum dolor, sit
amet consectetur adipisicing elit. Enim fugiat fuga illum doloribus
perferendis asperiores ab voluptatem laudantium, dignissimos nulla. Nemo
minus aliquid nesciunt quos temporibus ratione dicta quas doloremque.
</header>

<main>
<h1>Title</h1>
<p>Contents</p>
</main>

<footer>
<div>
Lorem ipsum dolor, sit amet consectetur adipisicing elit. Nesciunt soluta
hic, odit ad quisquam iste? Magnam, animi ut, tempore libero a aliquam
vitae quos alias possimus fugiat officia, temporibus illo!
</div>
</footer>
</div>

위와 같은 HTML 구조를 가지는 예시를 들어보자.

1
2
3
4
5
6
.main-layout {
min-height: 100vh;

display: grid;
grid-template-rows: auto 1fr auto;
}
  • header, main, footer 를 감싸는 컨테이너의 min-height100vh로 화면에 꽉차게 설정
  • grid 속성을 주어 빈 공간이 없게 만든다.
  • grid의 rows 속성의 너비를 지정한다.
    • auto로 설정하면 해당 태그가 가지고 있는 높이만큼만 설정하게된다.

댓글 공유

개발을 하다보면 디자이너나 클라이언트의 요구사항을 만족시키기 위해 기본 input 태그나 select 태그 등을 커스텀 해야하는 경우가 많다.

문제

커스텀 select 태그를 만들어서 아이콘도 img 태그를 사용하여 추가해주었다.

하지만, select 태그 내부의 icon을 클릭하게 되면 select 태그가 열리지 않는 불편함이 있다.

해결

아이콘에 pointer-events:none; 속성을 추가한다.

1
2
3
4
5
6
7
8
9
10
11
12
13
14
15
16
.custom-select {
width: 200px;
position: relative;

select {
width: 100%;
height: 24px;
}
}

.select-icon {
position: absolute;
top: 5px;
right: 5px;
pointer-events: none;
}
  • 이렇게 하면 아이콘을 클릭해도 select 태그가 클릭된 것처럼 제대로 동작한다.

댓글 공유

완전탐색(Brute Forcing)

카테고리 Python

완전탐색(Brute Forcing)

가능한 모든 경우의 수를 검사하는 방법

문제 1

시간에서 ‘3’이 포함된 횟수 구하는 문제

1
2
3
4
5
6
7
8
9
10
h = int(input())

count = 0
for i in range(h+1):
for j in range(60):
for k in range(60):
if '3' in str(i)+str(j)+str(k):
count += 1

print(count)

문제 2

체스 말이 움직일 수 있는 경우의 수 구하라

1
2
3
4
5
6
7
8
9
10
11
12
13
14
15
16
17
18
col,row = map(str,input())

n = 8

# ASCII 코드 구하는 코드 ord(str), ord('a') = 97
array = [[i+1 for i in range(n)] for _ in range(n)]

steps = [(-2,-1),(-1,-2),(1,-2),(2,-1),(2,1),(1,2),(-1,2),(-2,1)]

count = 0
for step in steps:
y = int(row) + step[0]
x = int(ord(col)) - int(ord('a')) + 1 + step[1]
if x < 1 or y < 1 or x > 8 or y > 8:
continue
count += 1

print(count)
1
2
3
4
5
6
# 말이 움직이는 벡터 방향
dx = [2,2,-2,-2,1,1,-1,-1]
dy = [1,-1,1,-1,2,-2,2,-2]

# x,y로 방향이 2개로 정해져있으니 튜플 사용 가능
steps = [(-2,-1),(-1,-2),(1,-2),(2,-1),(2,1),(1,2),(-1,2),(-2,1)]
  • ASCII 코드를 사용하여 ‘a’ 문자열을 숫자로 변환

문제 3

문자는 정렬하고 숫자는 더하여 반환하라

1
2
3
4
5
6
7
8
9
10
11
12
13
14
15
16
input = input()
result = []
value = 0

for i in input:
if i.isalpha():
result.append(i)
else:
value += int(i)

result.sort()

if value != 0:
result.append(str(value))

print(''.join(result))
  • isalpha() 내장함수를 사용하여 i가 문자열인지 확인
  • join() 내장함수를 사용하여 list를 문자열로 합침

댓글 공유

greedy 알고리즘

탐욕적으로 현재 상황에서 가장 최적의 문제풀이를 위한 최소한의 아이디어를 떠올리고 이것이 정당한지 검토한다.

문제

1이 될 때 까지, N을 K로 나누거나 N에 1을 빼거나 행동의 최소 횟수 구하기

조건

N(1 <= N <= 100,000) K(2 <= K <= 100,000)

풀이

K가 2이상이므로 1을 빼는 것보다 최대한 많이 나누는 것이 연산횟수를 최소화할 수 있다.

1
2
3
4
5
6
7
8
9
10
11
12
13
14
15
16
17
18
19
20
21
22
23
24
N,K = list(map(int,input().split(' ')))
count = 0

# 시간복잡도 O(N)
while N != 1:
if (N % K == 0):
N /= K
count += 1
continue
N -= 1
count += 1

# 시간복잡도 O(log N)
while True:
target = (N // K) \* K
count += (N - target)
N = target
if N < K:
break
count += 1
N //= K

count += (N - 1)
print(count)

댓글 공유

리스트 컴프리핸션

1
2
3
4
5
6
7
n = 4
m = 3

array = [[0] \* m for \_ in range(n)]

array[0][1] = 5
print(array)

2차원 배열 참조값 복사 오류

1
2
3
4
5
6
7
8
n1 = 4
m1 = 3

# 참조값이 복사되어 원하는 부분 이외의 요소도 변경됨

array1 = [[0]*m]*n
array1[0][1] = 5
print(array1)

dictionary

1
2
3
4
5
6
7
8
9
10
data = dict()
data['apple'] = '사과'
data['banana'] = '바나나'

if 'apple' in data:
print(data['apple']+'가 존재합니다.')

key_list = list(data.keys())

print(key_list)

set 자료형

1
2
3
4
5
6
c = 3.11
print(int(c))

sett = set([1,2,3])
print(sett)
print(sett)

입력

1
2
3
4
5
6
7
8
9
10
11
12
13
14
15
16
17
18
19
n = int(input())

data = list(map(int,input().split()))

x,y,z = map(int,input().split())

print(n)

print(data)

print(x,y,z)

# sys.stdin.readline() 빠른 입력

import sys

data1 = sys.stdin.readline().rstrip();

print(data1)

출력

1
2
3
4
5
6
7
8
9
f = 1
g = 2

print(f,g)
print(f, end=' ')
print(g, end=" ")

answer = 7
print(f"정답은 {answer}입니다.")

조건문

1
2
3
4
5
6
7
8
9
10
11
12
13
14
15
16
x = 15
if x >= 10:
print('X는 10이상입니다.')

if x >= 0:
print('X는 0 이상입니다.')

if x >= 0 and x <= 100:
print('X는 0보다 크거나 같고 100보다 작거나 같습니다.')

res = 'cool' if x>10 else 'fail'
print(res)

if x > 12: rest = 'cooler'

print(rest)

반복문

1
2
3
4
5
6
7
8
9
10
11
12
13
14
15
16
17
18
19
20
21
22
23
24
i = 1
result = 0

while i <= 9:
result += i
i += 1

print(result)

arr = [9,8,7,6,5,4]

for x in arr:
print(x)

rss = 0
for k in range(1,10):
rss += k

print(rss)

for u in range(2,10):
for o in range(1,10):
print(f"{u} X {o} = {u\*o}")
print()

함수

1
2
3
4
5
6
7
8
9
10
gf = 0

def func():
global gf
gf += 1

for \_ in range(10):
func();

print(gf)

람다표현식

1
2
3
4
5
6
7
8
9
10
11
12
print((lambda a,b: a+b)(33,7))

people = [('홍길동',10),('이순신', 5),('아무개',70)]

print(sorted(people,key=lambda x: x[1]))

list1 = [1,2,3,4,5]
list2 = [6,7,8,9,10]

list_result = map(lambda a,b:a+b, list1, list2)

print(list(list_result))

내장함수

1
2
3
4
5
6
7
8
9
10
11
12
13
14
15
16
17
18
19
20
21
22
23
24
25
26
27
28
29
30
31
32
33
34
35
36
37
38
39
40
41
42
43
44
45
46
47
48
minvalue = min(10,2,3,7)

print(minvalue)

evalvalue = eval('3\*5-2');

print(evalvalue)

from itertools import permutations
from itertools import combinations
from itertools import product
from itertools import combinations_with_replacement

dataaa = ['a','b','c']

print(list(permutations(dataaa,3)))
print(list(combinations(dataaa,2)))

# 2개를 뽑는 모든 순열 (중복포함)

print(list(product(dataaa,repeat=2)))

# 2개를 뽑는 모든 조합 (중복포함)

print(list(combinations_with_replacement(dataaa,2)))

# 객체의 갯수 구하기

from collections import Counter

counter = Counter(['red','blue','red','green','blue','blue'])

print(counter['blue'])
print(counter['green'])
print(dict(counter))

# 최대 공약수, 최소 공배수

import math

def lcm(a,b):
return a\*b // math.gcd(a,b);

v = 21
j = 14

print(math.gcd(v,j))
print(lcm(v,j))

댓글 공유

1. ESLint와 Prettier 사용하기

import/order 까지 설정해두면 복잡한 import 구문의 가독성을 조금이나마 개선할 수 있다.

1
2
3
4
5
6
7
8
9
10
11
12
13
14
15
16
17
18
19
20
21
22
23
24
25
26
27
28
29
30
31
32
33
34
// .eslintrc.json
{
...
"rules": {
"import/order": [
2,
{
"newlines-between": "always",
"groups": [
"builtin",
"external",
"internal",
"parent",
"sibling",
"index",
"unknown",
"object",
"type"
],
"alphabetize": {
"order": "asc",
"caseInsensitive": true
},
"pathGroups": [
{
"pattern": "react*",
"group": "external",
"position": "before"
}
]
}
]
}
}

2. 네이밍 컨벤션

컴포넌트, interface, type에는 PascalCase를 써라

1
2
3
4
5
6
7
8
9
10
11
12
13
14
// React component
const BannersEditForm = () => {
...
}

// Typescript interface
interface TodoItem {
id: number;
name: string;
value: string;
}

// Typescript type alias
type TodoList = TodoItem[];

JavaScript 데이터(변수, 배열, 객체, 함수 등)은 camelCase를 써라

1
2
3
const getLastDigit = () => { ... }

const userTypes = [ ... ]

또한, 폴더와 컴포넌트가 아닌 파일 이름은 camelCase를 사용하고 컴포넌트 파일에는 PascalCase를 써라

1
2
3
src/utils/form.ts
src/hooks/useForm.ts
src/components/banners/edit/Form.tsx

3. TypeScript 통(barrels)을 사용해라

barrels는 여러 export를 하나의 파일에서 다루는 방법이다.

1
2
3
4
5
6
// barrel file example
export * from "./DropDown";
export * from "./TextBox";
export * from "./CheckBox";
export * from "./DateTimePicker";
export * from "./Slider";
1
2
3
4
5
6
7
import {
DropDown,
TextBox,
CheckBox,
DateTimePicker,
Slider,
} from "./src/controls";
  • 이렇게 하면 import를 여러 파일에서 하지 않고 하나의 파일에서 할 수 있어 간편하다.
  • 이렇듯 타입스크립트도 barrels를 사용하여 관리하면 클린 코드에 좋을 것이다.

4. 기본 내보내기 (default export)를 피하라

기본 내보내기는 내보낼 항목과 어떤 이름도 연결하지 않는다.

즉, 개발자가 내보내려는 이름대로 가져오는 것이 클린 코드에 보다 적합하다.

1
2
3
4
5
6
7
// ❌
export default MyComponent;

// ✅
export { MyComponent };
export const MyComponent = ...;
export type MyComponentType = ...;

5. 컴포넌트 구조 통일하기

모든 컴포넌트의 구조를 다음과 같이 통일해라

1
2
3
4
5
6
7
8
9
10
11
12
13
14
15
16
17
18
19
20
21
22
23
24
25
26
27
28
29
30
31
32
33
34
35
36
37
38
39
40
41
42
43
44
45
46
47
48
49
50
51
52
53
54
55
56
57
58
59
60
61
62
63
64
65
66
67
68
69
70
71
72
73
74
75
76
77
78
79
80
81
82
83
84
85
86
87
88
89
90
91
92
93
94
95
96
97
98
99
100
// 1. Imports - Prefer destructuring imports to minimize writen code
import React, { PropsWithChildren, useState, useEffect } from "react";

// 2. Types
type ComponentProps = {
someProperty: string;
};

// 3. Styles - with @mui use styled API or sx prop of the component
const Wrapper = styled("div")(({ theme }) => ({
color: theme.palette.white,
}));

// 4. Additional variables
const SOME_CONSTANT = "something";

// 5. Component
function Component({ someProperty }: PropsWithChildren<ComponentProps>) {
// 5.1 Definitions
const [state, setState] = useState(true);
const { something } = useSomething();

// 5.2 Functions
function handleToggleState() {
setState(!state);
}

// 5.3 Effects
// ❌
React.useEffect(() => {
// ...
}, []);

// ✅
useEffect(() => {
// ...
}, []);

// 5.5 Additional destructures
const { property } = something;

return (
<div>
{/* Separate elements if not closed on the same line to make the code clearer */}
{/* ❌ */}
<div>
<div>
<p>Lorem ipsum</p>
<p>Pellentesque arcu</p>
</div>
<p>Lorem ipsum</p>
<p>Pellentesque arcu</p>
</div>
<div>
<p>
Lorem ipsum dolor sit amet, consectetuer adipiscing elit. Pellentesque
arcu. Et harum quidem rerum facilis est et expedita distinctio.
</p>
<p>Pellentesque arcu</p>
<p>
Lorem ipsum dolor sit amet, consectetuer adipiscing elit. Pellentesque
arcu. Et harum quidem rerum facilis est et expedita distinctio.
</p>
</div>

{/* ✅ */}
<Wrapper>
<div>
<p>Lorem ipsum</p>
<p>Pellentesque arcu</p>
</div>

<p>Lorem ipsum</p>
<p>Pellentesque arcu</p>
</Wrapper>

<div>
<div>
<p>
Lorem ipsum dolor sit amet, consectetuer adipiscing elit.
Pellentesque arcu. Et harum quidem rerum facilis est et expedita
distinctio.
</p>

<p>Pellentesque arcu</p>

<p>
Lorem ipsum dolor sit amet, consectetuer adipiscing elit.
Pellentesque arcu. Et harum quidem rerum facilis est et expedita
distinctio.
</p>
</div>
</div>
</div>
);
}

// 6. Exports
export { Component };
export type { ComponentProps };

6. PropsWithChildren 을 사용해라

1
2
3
4
5
6
7
8
9
10
11
12
13
import React, { PropsWithChildren } from "react";

type ComponentProps = {
someProperty: string,
};

// ✅
function Component({
someProperty,
children,
}: PropsWithChildren<ComponentProps>) {
// ...
}
  • props로 children을 내려주고 children 타입을 설정해주는 작업이 반복적으로 발생할 때 번거로움을 해소하고자 PropsWithChildren을 사용할 수 있다.

PropsWithChildren의 children 타입은 optional 하다. 그러므로 꼭 children이 들어가야하는 컴포넌트에서 보다 엄격하게 타입을 지정해주기 위해서는 children:ReactNode로 타입을 지정해주는 방법이 있다.

7. JSX에서 함수가 한줄 이상이라면 분리하라

1
2
3
4
5
6
7
8
9
10
11
12
13
14
15
16
17
18
19
20
// ❌
<button
onClick={() => {
setState(!state);
resetForm();
reloadData();
}}
/>

// ✅
<button onClick={() => setState(!state)} />

// ✅
const handleButtonClick = () => {
setState(!state);
resetForm();
reloadData();
}

<button onClick={handleButtonClick} />

8. Key props로 index를 사용을 피해라

1
2
3
4
5
6
7
8
9
10
11
12
13
14
15
16
17
18
19
20
21
22
23
24
25
26
27
28
29
// ❌
const List = () => {
const list = ["item1", "item2", "item3"];

return (
<ul>
{list.map((value, index) => {
return <li key={index}>{value}</li>;
})}
</ul>
);
};

// ✅
const List = () => {
const list = [
{ id: "111", value: "item1" },
{ id: "222", value: "item2" },
{ id: "333", value: "item3" },
];

return (
<ul>
{list.map((item) => {
return <li key={item.id}>{item.value}</li>;
})}
</ul>
);
};

공시군서에 따르면 배열 내에서만 고유한 값을 전달해주면 된다고 나와있으니 map 고차함수를 사용하여 index를 key prop로 전달해도 될 것 같다.

하지만 이렇게 할 경우, React에서는 props가 변경되면 컴포넌트를 재렌더링하는데, 배열에서 리스트를 추가, 삭제하면 index가 변경되므로 변경되지 않은 다른 리스트들도 불필요한 재렌더링이 발생하게 된다.

그러므로 key prop에는 item의 id, react uid 라이브러리로 고유한 key를 지정해줘야한다.

9. fragments를 써라

1
2
3
4
5
6
7
8
9
10
11
12
13
14
15
16
17
18
19
// ❌
const ActionButtons = ({ text1, text2 }) => {
return (
<div>
<button>{text1}</button>
<button>{text2}</button>
</div>
);
};

// ✅
const Button = ({ text1, text2 }) => {
return (
<>
<button>{text1}</button>
<button>{text2}</button>
</>
);
};

불필요한 div 태그 대신 Fragment를 사용하자

10. 구조분해할당 사용하라

1
2
3
4
5
6
7
8
9
10
11
12
13
14
15
16
// ❌
const Button = (props) => {
return <button>{props.text}</button>;
};

// ✅
const Button = (props) => {
const { text } = props;

return <button>{text}</button>;
};

// ✅
const Button = ({ text }) => {
return <button>{text}</button>;
};

11. 관심사를 분리해라

presentation 컴포넌트에서 business 로직을 분리하는 것은 컴포넌트 코드의 가독성을 높힐 수 있다.

대부분의 page, screen, container 컴포넌트에 다수의 hook과 useEffect를 사용하려고 할 때 business 로직을 분리하는 것을 시도할 수 있다.

custom hook

관심사(책임)을 분리하기 위해서 useEffect나 다수의 useState를 컴포넌트에 직접 넣는 대신 Custom hook을 사용해라

1
2
3
4
5
6
7
8
9
10
11
12
13
14
15
16
17
18
19
20
21
22
23
24
25
26
27
28
29
30
31
32
33
34
35
36
37
38
39
40
41
42
43
44
45
46
47
48
49
50
51
52
53
54
55
56
57
58
59
60
61
62
63
// ❌
const ScreenDimensions = () => {
const [windowSize, setWindowSize] = useState({
width: undefined,
height: undefined,
});

useEffect(() => {
function handleResize() {
setWindowSize({
width: window.innerWidth,
height: window.innerHeight,
});
}

window.addEventListener("resize", handleResize);
handleResize();

return () => window.removeEventListener("resize", handleResize);
}, []);

return (
<>
<p>Current screen width: {windowSize.width}</p>
<p>Current screen height: {windowSize.height}</p>
</>
);
};

// ✅
const useWindowSize = () => {
const [windowSize, setWindowSize] = useState({
width: undefined,
height: undefined,
});

useEffect(() => {
function handleResize() {
setWindowSize({
width: window.innerWidth,
height: window.innerHeight,
});
}

window.addEventListener("resize", handleResize);
handleResize();

return () => window.removeEventListener("resize", handleResize);
}, []);

return windowSize;
};

const ScreenDimensions = () => {
const windowSize = useWindowSize();

return (
<>
<p>Current screen width: {windowSize.width}</p>
<p>Current screen height: {windowSize.height}</p>
</>
);
};

12. 거대 컴포넌트를 피해라

거대 컴포넌트가 가능하더라도, 컴포넌트를 작은 단위로 분리해라.

주로 조건부 렌더링을 할 때 사용할 수 있다.

1
2
3
4
5
6
7
8
9
10
11
12
13
14
15
16
17
18
19
20
21
22
23
24
25
26
27
28
29
30
31
32
33
34
35
36
37
38
39
40
41
42
43
44
45
46
47
// ❌
const SomeSection = ({ isEditable, value }) => {
if (isEditable) {
return (
<Section>
<Title>Edit this content</Title>
<Content>{value}</Content>
<Button>Clear content</Button>
</Section>
);
}

return (
<Section>
<Title>Read this content</Title>
<Content>{value}</Content>
</Section>
);
};

// ✅
const EditableSection = ({ value }) => {
return (
<Section>
<Title>Edit this content</Title>
<Content>{value}</Content>
<Button>Clear content</Button>
</Section>
);
};

const DetailSection = ({ value }) => {
return (
<Section>
<Title>Read this content</Title>
<Content>{value}</Content>
</Section>
);
};

const SomeSection = ({ isEditable, value }) => {
return isEditable ? (
<EditableSection value={value} />
) : (
<DetailSection value={value} />
);
};

13. 가능하다면 state를 그룹화해라

1
2
3
4
5
6
// ❌
const [username, setUsername] = useState("");
const [password, setPassword] = useState("");

// ✅
const [user, setUser] = useState({});

14. boolean shorthand를 사용해라

1
2
3
4
5
// ❌
<Form hasPadding={true} withError={true} />

// ✅
<Form hasPadding withError />

15. curly braces를 피해라

1
2
3
4
5
// ❌
<Title variant={"h1"} value={"Home page"} />

// ✅
<Title variant="h1" value="Home page" />

16. inline 스타일을 피해라

1
2
3
4
5
6
7
8
9
10
11
12
13
14
15
16
17
18
19
20
21
22
23
24
25
26
27
28
// ❌
const Title = (props) => {
return (
<h1 style={{ fontWeight: 600, fontSize: "24px" }} {...props}>
{children}
</h1>
);
};

// ✅
const useStyles = (props) => {
return useMemo(
() => ({
header: { fontWeight: props.isBold ? 700 : 400, fontSize: "24px" },
}),
[props]
);
};

const Title = (props) => {
const styles = useStyles(props);

return (
<h1 style={styles.header} {...props}>
{children}
</h1>
);
};

17. 조건부 렌더링은 삼항 연산자 사용해라

1
2
3
4
5
6
7
8
9
10
11
const { role } = user;

// ❌
if (role === ADMIN) {
return <AdminUser />;
} else {
return <NormalUser />;
}

// ✅
return role === ADMIN ? <AdminUser /> : <NormalUser />;

18. 타입 별칭을 사용해라

1
2
3
4
5
6
7
8
9
10
11
export type TodoId = number;
export type UserId = number;

export interface Todo {
id: TodoId;
name: string;
completed: boolean;
userId: UserId;
}

export type TodoList = Todo[];

19. 써드 파티 라이브러리를 직접 사용하는 것을 피해라

1
2
// src/lib/store.ts
export { useDispatch, useSelector } from "react-redux";
1
2
// src/lib/query.ts
export { useQuery, useMutation, useQueryClient } from "react-query";

20. 직접 구현 대신 추상화에 의존해라

1
2
3
4
5
6
7
8
9
10
11
12
13
14
15
16
17
18
19
20
21
22
23
24
25
26
27
28
29
30
31
32
33
34
35
36
37
38
// ❌ directly using momemt
import moment from "moment";

const updateProduct = (product) => {
const payload = {
...product,
// ❌ we are bound to the moment interface implementation
updatedAt: moment().toDate(),
};

return await fetch(`/product/${product.id}`, {
method: "PUT",
body: JSON.stringify(payload),
});
};

// ✅ creating the abstraction, a.k.a. helper function which wraps the functionality

// utils/createDate.ts
import moment from "moment";

export const createDate = (): Date => moment().toDate();

// updateProduct.ts
import { createDate } from "./utils/createDate";

const updateProduct = (product) => {
const payload = {
...product,
// ✅ using the abstracted helper function
updatedAt: createDate(),
};

return await fetch(`/product/${product.id}`, {
method: "PUT",
body: JSON.stringify(payload),
});
};
  • moment를 사용하여 직접 구현하기 보다 createDate 함수사용하여 추상화하면 간결하다.

21. 선언적 프로그래밍을 해라

1
2
3
4
5
6
7
8
9
10
11
// ❌ imperative: dealing with internals of array iteration
const arr = [1, 2, 3, 4, 5, 6, 7, 8, 9];
let sum = 0;

for (let i = 0; i < arr.length; i++) {
sum += arr[i];
}

// ✅ declarative: we don't deal with internals of iteration
const arr = [1, 2, 3, 4, 5, 6, 7, 8, 9];
const sum = arr.reduce((acc, v) => acc + v, 0);

22. 변수 이름을 이쁘게 지어라

1
2
3
4
5
6
7
8
9
10
11
12
13
14
// ❌ Avoid single letter names
const n = "Max";
// ✅
const name = "Max";

// ❌ Avoid abbreviations
const sof = "Sunday";
// ✅
const startOfWeek = "Sunday";

// ❌ Avoid meaningless names
const foo = false;
// ✅
const appInit = false;

23. 함수 인자를 3개 이상 넘기지 말아라

1
2
3
4
5
6
7
8
9
10
11
12
13
14
15
// ❌
function createPerson(firstName, lastName, height, weight, gender) {
// ...
}

// ✅
function createPerson({ firstName, lastName, height, weight, gender }) {
// ...
}

// ✅
function createPerson(person) {
const { firstName, lastName, height, weight, gender } = person;
// ...
}

24. template literal 사용해라

1
2
3
4
5
// ❌
const userName = user.firstName + " " + user.lastName;

// ✅
const userDetails = `${user.firstName} ${user.lastName}`;

25. 간단한 함수에서 암묵적 return 사용해라

1
2
3
4
5
6
7
// ❌
const add = (a, b) => {
return a + b;
};

// ✅
const add = (a, b) => a + b;

참고

React Code Conventions and best practices - Medium

댓글 공유

:not 셀렉터

1
2
3
4
5
<ul class="grid">
<li class="grid__child"></li>
</ul>
1
2
3
4
5
6
7
8
9
10
11
.grid {
display: grid;
grid-template-columns: repeat(auto-fit, 15rem);
grid-gap: 1rem;
}

.grid__child {
background: rgba(0, 0, 0, 0.1);
border-radius: 0.5rem;
aspect-ratio: 1/1;
}
  • 이렇게 생긴 그리드 아이템에 마우스 올린 요소만 hover 효과를 주고 나머지 요소는 공통적으로 다른 효과를 주고 싶을 때, :not, :hover 셀렉터가 유용하다.
1
2
3
.grid:hover .grid__child:not(:hover) {
opacity: 0.3;
}

  • 이렇게 마우스가 올라간 요소만 제외하고 opacity가 변경되는 것을 볼 수 있다.

하지만 한가지 문제점은 grid의 gap이 있을 경우 item에 마우스가 올라갔을 때 뿐만 아니라 gap에 마우스가 올라갔을 때에도 해당 css가 적용된다.

이를 해결하기 위해서 부모 요소에는 pointer-events: none을 주고 자식 요소에는 pointer-events: auto를 줘서 해결할 수 있다.

1
2
3
4
5
6
7
8
9
10
11
12
13
14
15
16
17
.grid {
display: grid;
grid-template-columns: repeat(auto-fit, 15rem);
grid-gap: 2rem;
pointer-events: none;
}
.grid__child {
background: rgba(0, 0, 0, 0.1);
border-radius: 0.5rem;
aspect-ratio: 1/0.5;
pointer-events: auto;
transition: opacity 0.3s;
}

.grid:hover .grid__child:not(:hover) {
opacity: 0.3;
}

TroubleShooting

pointer-events: none 속성은 hover이벤트 뿐만 아니라 다른 모든 이벤트도 무시한다. 그래서 scroll이 되어야하는 경우에 스크롤이 되지 않는 문제가 발생할 수 있다.

이를 해결하기 위해서는 해당 부모요소를 감싸는 container 박스를 생성하는 것이다.

1
2
3
4
5
6
7
8
9
10
11
<div class="container">
<ul class="grid">
<li class="grid__child"></li>
</ul>
</div>
1
2
3
4
5
6
7
8
9
10
11
12
13
14
15
16
17
18
19
20
21
22
23
24
25
26
27
.container {
width: 400px;
height: 300px;
overflow: auto;
}

.grid {
display: grid;
grid-template-columns: repeat(auto-fit, 15rem);
grid-gap: 2rem;
pointer-events: none;
}
.grid__child {
background: rgba(0, 0, 0, 0.1);
border-radius: 0.5rem;
aspect-ratio: 1/0.5; // 가로 세로 비율
pointer-events: auto;
transition: opacity 0.3s;
}

.grid:hover .grid__child:not(:hover) {
opacity: 0.3;
}

li {
list-style-type: none;
}
  • grid 요소를 감싸는 container 요소에 scroll을 가능하게 overflow:auto 속성을 주면 스크롤도 작동하고 gap 부분에서 hover 이벤트도 방지할 수 있다.

댓글 공유

Omit<T,K> 타입

1
2
3
4
5
6
7
8
9
10
11
interfact Todo {
title:string;
description:string;
completed:boolean;
}

type TodoPreview = MyOmit<Todo, 'description' | 'title'>

const todo: TodoPreview {
completed:false
}
  • TypeScript Omit타입은 해당 객체 타입에서 Key 타입을 제외할 때 사용한다.

댓글 공유

loco9939

author.bio


author.job