앞서 IaaS와 PaaS의 장점만 결합시킨 것이 도커이다. IaaS의 이식성과 PaaS의 운영비 장점을 갖춘 도커에 대해 알아보자.
서사를 위해서 전통적인 배포는 어떠했을지 살펴보자.
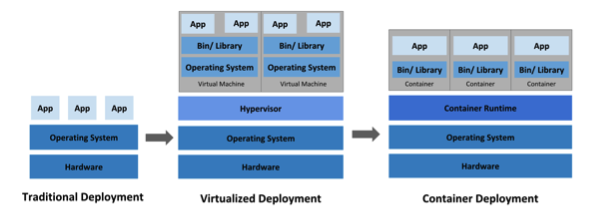
전통적 배포
물리적 컴퓨터 한 대에 하나의 OS를 깔고 여러 프로그램을 설치하는 방식이었다. 이 때, 어떤 프로그램 설치하게되면 다른 앱에 영향을 미친다.
예를 들어, 예전에 보안 앱을 깔았더니 인터넷이나 어떤 애플리케이션이 제대로 동작하지 않았던 경험이 있다.
가상화 배포
전통적 배포에서 발전이 되어 가상머신을 기반으로 배포하는 가상화 배포가 등장하였다.
Hypervisor는 하나의 시스템상에서 가상 컴퓨터 여러 개를 구동할 수 있도록 중간계층 역할을 한다.
결과적으로 컴퓨터 한 대로 여러 앱을 독립적으로 실행하여 다른 앱에 영향을 끼치지 않는다.
단, OS도 독립적이기 때문에 비용이 많이든다.
가상머신: 컴퓨터 모든 부품을(HardWare) 소프트웨어적으로 구현한 것
컨테이너 배포
컨테이너는 코드와 모든 종속성(Node.js, 라이브러리 등)을 패키징하는 소프트웨어 표준 단위이다.
컨테이너는 VM(Virtual Machine)과 유사하지만, 운영체재(OS)만 공유하고 애플리케이션은 독립적 컴퓨터로 구분되어 있다.
때문에 애플리케이션끼리 영향을 미치지 않고 비용도 가상화 배포보다 저렴하고 빠르다.
다만 OS는 공유하기 때문에 애플리케이션의 문제가 OS에 영향을 미치면 구동 중인 전체 컨테이너에 문제가 될 수 있다.
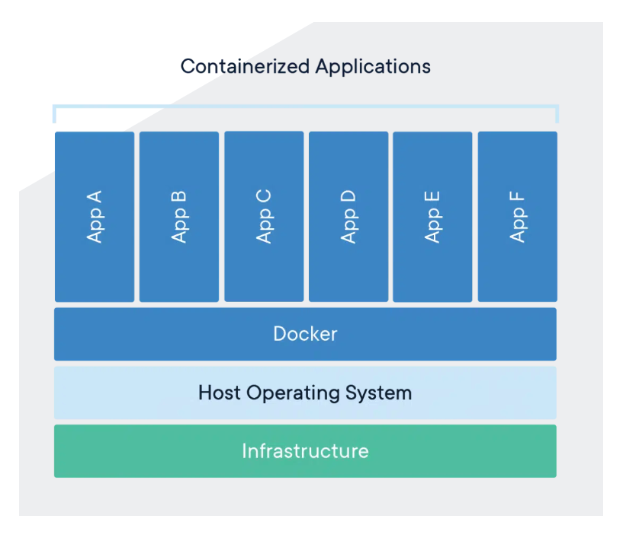
Docker
그래서 도커는 앞서 설명한 컨테이너라는 단위로 애플리케이션을 실행하는 기능을 제공하는 플랫폼이다.
여러 컴퓨터 간에 공유된 규격으로 리소스를 공유할 수 있어 유지보수성이 좋다.
또한 IaaS의 이식성과 PaaS의 운영비 장점을 갖추었다.
기존의 종속성 라이브러리나 파일 등 기존 시스템에 대한 설치 절차를 Dockerfile 스크립트에 작성하고 배포 관련 사항을 도커스웜이나 쿠버네티스에 맞춰 작성해주기만 하면 된다. 그래서 보통 도커 + 쿠버네티스 또는 도커 + 도커 스웜으로 구축된다.
Docker 컨테이너 빌드 과정
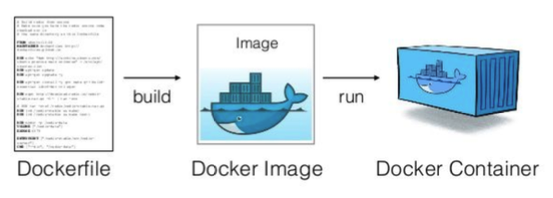
- 도커파일이 빌드
- 도커 이미지 생성 및 실행
- 도커 컨테이너 실행
- 도커파일(Dockerfile): 컨테이너에 설치해야하는 패키지, 환경 변수설정 등을 기록한 하나의 파일
- 도커이미지: 도커가 도커파일의 단계에 따라 컴퓨터의 상태를 “스냅샷”으로 저장한 것
- 컨테이너: 도커가 이미지를 불러와 실행할 때 생성되며, 실행중인 컨테이너는 이미지에 지정된 프로그램과 데이터를 사용해 일반적인 실제 컴퓨터와 연결되어 사용가능
Docker는 IaaS인가? PaaS인가?
엄밀히 말하면 둘 다 아니고 “클라우드 가상화기술”이지만 굳이 따지면 PaaS의 일부라고 보면된다.
컨테이너의 가상화는 가상 머신의 가상화가 일어나는 곳에서 한 추상화 계층 높은 곳에서 일어난다.
댓글 공유